SNMP Trap Receiver Setup | SNMPv1, v2c, v3 Configuration Guide
25 minute read
Overview
The SNMP Trap source node enables Edge Delta to receive and process SNMP trap notifications sent from network devices, servers, applications, and infrastructure components. It acts as a trap receiver (trap daemon) that listens for unsolicited SNMP notifications over UDP, supporting SNMPv1, SNMPv2c, and SNMPv3 trap formats.
Use the configuration wizard below to generate a starter YAML configuration.
This allows you to capture real-time alerts and events from your entire infrastructure without actively polling devices. Unlike the SNMP Pull source which actively polls devices at intervals, SNMP Trap passively receives notifications when devices detect events.
This node requires Edge Delta agent version v2.5.0 or higher.
AI Team: Configure this source using the SNMP Trap connector for streamlined setup in AI Team.
- outgoing_data_types: log
The SNMP Trap source node is ideal for:
- Network Device Monitoring: Receive alerts from routers, switches, firewalls, and wireless controllers
- Infrastructure Alerting: Capture temperature, power, and hardware failure notifications
- Application Event Collection: Gather custom traps from SNMP-enabled applications
- Security Event Monitoring: Collect authentication failures and security violations
- Environmental Monitoring: Receive alerts from UPS systems, cooling units, and sensors
Field Mapping
The SNMP Trap source node extracts and maps the following fields from incoming trap messages:
| SNMP Field | Attribute Name | Description |
|---|---|---|
| Version | snmp.version | SNMP version (1 or 2c) |
| PDU Type | snmp.pdu.type | Protocol Data Unit type (Trap, SNMPv2Trap) |
| Source IP | network.peer.ip | IP address of the trap sender |
| Variables | snmp.varbinds | Variable bindings as OID-value pairs |
| Variable Count | snmp.variables.count | Number of variables in the trap |
| Request ID | snmp.request.id | Request identifier (v2c only) |
| Enterprise OID | snmp.enterprise_oid | Enterprise identifier (v1 only) |
| Generic Trap | snmp.generic_trap | Generic trap type number (v1 only) |
| Generic Trap Name | snmp.generic_trap_name | Human-readable trap type (v1 only) |
| Specific Trap | snmp.specific_trap | Enterprise-specific trap number (v1 only) |
| Agent Address | snmp.agent.address | Agent IP address (v1 only) |
| Trap OID | snmp.trap_oid | Combined trap identifier (v1 only) |
SNMP Version Selection
The SNMP Trap source node supports multiple protocol versions to accommodate different security and compatibility requirements:
SNMP v1:
- Legacy protocol with basic trap support
- Simple community-based authentication
- Widely supported across older network devices
- Suitable for legacy infrastructure monitoring
SNMP v2c (default):
- Enhanced trap format with inform capability
- Community-based authentication using a shared password
- Widely supported across network devices
- Suitable for internal networks with basic security needs
SNMP v3:
- Enhanced security with user-based authentication
- Supports encryption for data privacy (AES, DES)
- Multiple authentication protocols (MD5, SHA family)
- Authoritative engine ID for secure trap ingestion
- Recommended for production environments and sensitive data
- Required when monitoring across untrusted networks
Choose v1 or v2c for quick setup and legacy device compatibility. Use v3 when security is a priority or when compliance requirements mandate encrypted communications.
Trap Type Mapping
SNMPv1 generic trap types are automatically mapped to descriptive names:
| Generic Trap | Name | Description |
|---|---|---|
| 0 | coldStart | Agent reinitialized with configuration changes |
| 1 | warmStart | Agent reinitialized without configuration changes |
| 2 | linkDown | Network interface went down |
| 3 | linkUp | Network interface came up |
| 4 | authenticationFailure | Authentication attempt failed |
| 5 | egpNeighborLoss | EGP neighbor relationship lost |
| 6 | enterpriseSpecific | Vendor-specific trap |
Example Configurations
Basic Configuration
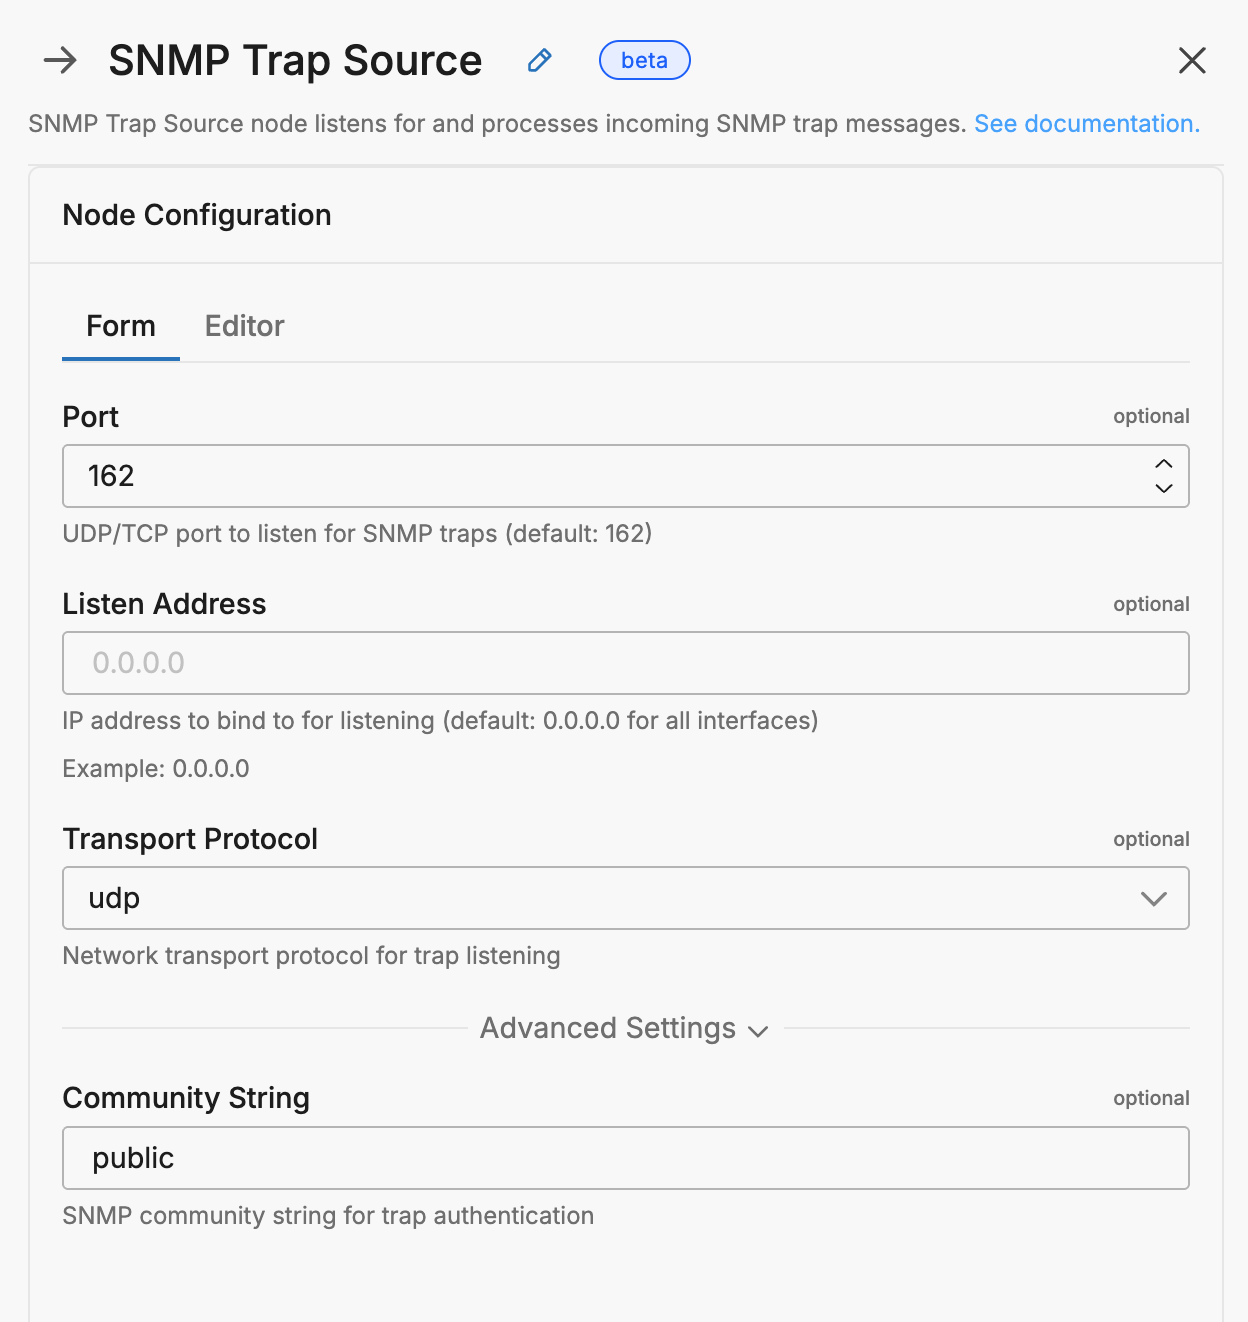
This minimal configuration uses all default settings to receive SNMP traps. The node automatically listens on the standard SNMP trap port and accepts traps from any source.
nodes:
- name: snmp_trap_receiver
  type: snmp_trap_input
Custom Port Configuration
For environments where the standard trap port is unavailable or when running without elevated privileges, specify a custom port above 1024.
nodes:
- name: snmp_trap_custom_port
  type: snmp_trap_input
  port: 1162
  listen: "0.0.0.0"
  transport: udp
Advanced Configuration with Community String
This configuration demonstrates advanced options including community string validation and specific network interface binding.
nodes:
- name: snmp_trap_secure
  type: snmp_trap_input
  port: 162
  listen: "10.0.0.100"
  transport: udp
  community: "secret-community"
  source_metadata: true
SNMPv3 Secure Configuration
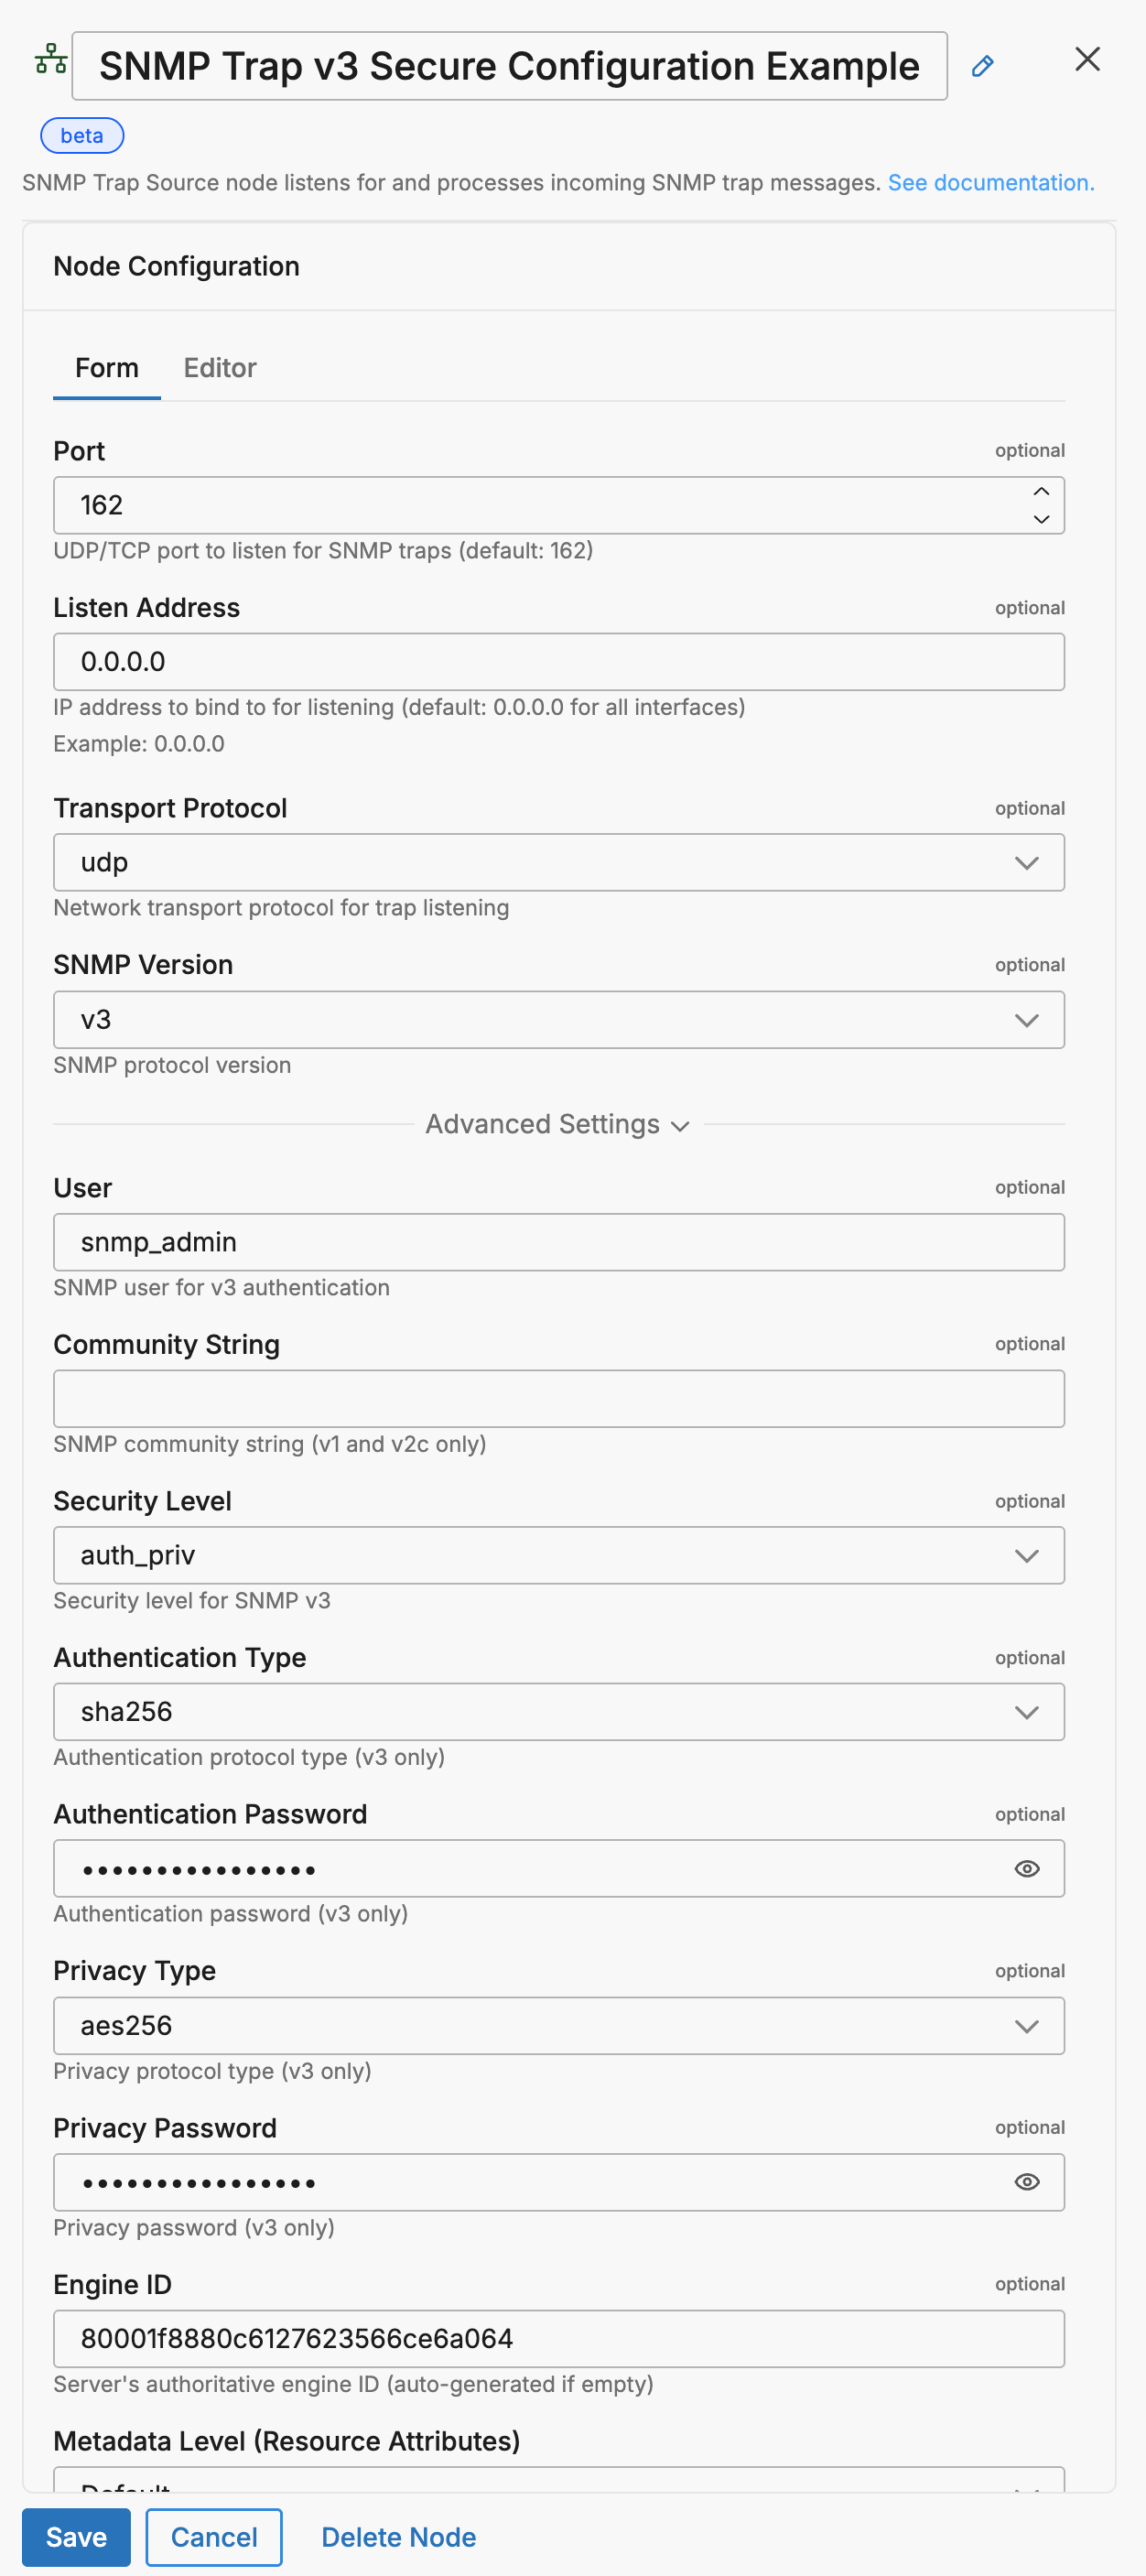
This configuration demonstrates enterprise-grade SNMPv3 trap reception with authentication and encryption. It includes SHA-256 authentication and AES-256 encryption for secure trap ingestion from devices across untrusted networks.
nodes:
- name: snmp_trap_v3_secure
  type: snmp_trap_input
  port: 162
  listen: "0.0.0.0"
  transport: udp
  version: v3
  user: snmp_admin
  security_level: auth_priv
  auth_type: sha256
  auth_password: my_auth_password
  privacy_type: aes256
  privacy_password: my_priv_password
  engine_id: "80001f8880c6127623566ce6a064"
Example Output
When SNMP traps are received, they are parsed and converted into structured log items. Below are examples showing the raw trap sent and the resulting processed data item.
SNMPv2c Cold Start Trap
Raw trap sent:
snmptrap -v 2c -c public <edge-delta-host> '' \
  1.3.6.1.6.3.1.1.5.1 \
  1.3.6.1.6.3.1.1.5.1 s "coldStart trap from router"
Processed data item in pipeline:
{
  "_type": "log",
  "timestamp": 1756958216967,
  "body": "SNMP 2c trap from 10.244.0.20",
  "resource": {
    "ed.source.name": "snmp_trap_receiver",
    "ed.source.type": "snmp_trap_input",
    "host.ip": "172.19.0.2",
    "host.name": "edge-delta-agent",
    "service.name": ""
  },
  "attributes": {
    "network.peer.ip": "10.244.0.20",
    "snmp.pdu.type": "SNMPv2Trap",
    "snmp.request.id": 2112302011,
    "snmp.varbinds": {
      ".1.3.6.1.2.1.1.3.0": {
        "centiseconds": 3522368,
        "duration": "9h47m3.68s",
        "seconds": 35223.68
      },
      ".1.3.6.1.6.3.1.1.4.1.0": ".1.3.6.1.6.3.1.1.5.1",
      ".1.3.6.1.6.3.1.1.5.1": "coldStart trap from router"
    },
    "snmp.variables.count": 3,
    "snmp.version": "2c"
  },
  "observed_timestamp": 1756958216990
}
SNMPv1 Enterprise-Specific Trap
Raw trap sent:
snmptrap -v 1 -c public <edge-delta-host> \
  1.3.6.1.4.1.9 192.168.1.1 6 33 100 \
  1.3.6.1.2.1.2.2.1.1 i 1
Processed data item in pipeline:
{
  "_type": "log",
  "timestamp": 1756958229890,
  "body": "SNMP trap enterpriseSpecific from 10.244.0.20",
  "resource": {
    "ed.source.name": "snmp_trap_receiver",
    "ed.source.type": "snmp_trap_input",
    "host.ip": "172.19.0.2",
    "host.name": "edge-delta-agent",
    "service.name": ""
  },
  "attributes": {
    "network.peer.ip": "10.244.0.20",
    "snmp.agent.address": "192.168.1.1",
    "snmp.enterprise_oid": ".1.3.6.1.4.1.9",
    "snmp.generic_trap": 6,
    "snmp.generic_trap_name": "enterpriseSpecific",
    "snmp.pdu.type": "Trap",
    "snmp.specific_trap": 33,
    "snmp.trap_oid": ".1.3.6.1.4.1.9.0.33",
    "snmp.varbinds": {
      ".1.3.6.1.2.1.2.2.1.1": 1
    },
    "snmp.variables.count": 1,
    "snmp.version": "1"
  },
  "observed_timestamp": 1756958229910
}
Temperature Alert Trap
Raw trap sent:
snmptrap -v 2c -c public <edge-delta-host> '' \
  1.3.6.1.4.1.9.9.13.1.3.0.2 \
  1.3.6.1.4.1.9.9.13.1.3.0.2 s "Temperature threshold exceeded: 85C"
Processed data item in pipeline:
{
  "_type": "log",
  "timestamp": 1756958222627,
  "body": "SNMP 2c trap from 10.244.0.20",
  "resource": {
    "ed.source.name": "snmp_trap_receiver",
    "ed.source.type": "snmp_trap_input",
    "host.ip": "172.19.0.2",
    "host.name": "edge-delta-agent",
    "service.name": ""
  },
  "attributes": {
    "network.peer.ip": "10.244.0.20",
    "snmp.pdu.type": "SNMPv2Trap",
    "snmp.request.id": 786929287,
    "snmp.varbinds": {
      ".1.3.6.1.2.1.1.3.0": {
        "centiseconds": 3522935,
        "duration": "9h47m9.35s",
        "seconds": 35229.35
      },
      ".1.3.6.1.4.1.9.9.13.1.3.0.2": "Temperature threshold exceeded: 85C",
      ".1.3.6.1.6.3.1.1.4.1.0": ".1.3.6.1.4.1.9.9.13.1.3.0.2"
    },
    "snmp.variables.count": 3,
    "snmp.version": "2c"
  },
  "observed_timestamp": 1756958222650
}
Required Parameters
name
A descriptive name for the node. This is the name that will appear in pipeline builder and you can reference this node in the YAML using the name. It must be unique across all nodes. It is a YAML list element so it begins with a - and a space followed by the string. It is a required parameter for all nodes.
nodes:
  - name: <node name>
    type: <node type>
type: snmp_trap_input
The type parameter specifies the type of node being configured. It is specified as a string from a closed list of node types. It is a required parameter.
nodes:
  - name: <node name>
    type: <node type>
Optional Parameters
disabled
The disabled parameter disables the node in the pipeline. When set to true, the agent ignores the node at startup. You can toggle nodes on or off in the pipeline builder. It is specified as a boolean, defaults to false, and is optional.
nodes:
  - name: <node name>
    type: <node type>
    disabled: true
port
The port parameter specifies the UDP port to listen on for incoming SNMP traps. The standard SNMP trap port is 162, but this requires elevated privileges. Common alternative ports include 1162 for unprivileged operation. If not specified, the node uses its default port configuration.
It is specified as an integer and is optional.
nodes:
  - name: <node name>
    type: snmp_trap_input
    port: 1162
listen
The listen parameter specifies the IP address to bind to for listening. Use “0.0.0.0” to listen on all network interfaces, or specify a particular IP address to restrict trap reception to a specific interface. Default is “0.0.0.0”.
It is specified as a string and is optional.
nodes:
  - name: <node name>
    type: snmp_trap_input
    listen: "0.0.0.0"
transport
The transport parameter specifies the transport protocol for receiving traps. SNMP traps are always sent via UDP according to the SNMP specification. This parameter defaults to “udp” and should not be changed.
It is specified as a string and is optional.
nodes:
  - name: <node name>
    type: snmp_trap_input
    transport: udp
version
The version parameter specifies the SNMP protocol version to use. Valid options are:
v1: SNMP version 1v2c: SNMP version 2c (default)v3: SNMP version 3 with enhanced security
It is specified as a string and is optional.
nodes:
  - name: <node name>
    type: snmp_trap_input
    version: v2c
community
The community parameter specifies the SNMP community string to validate incoming traps. If set, only traps with matching community strings will be accepted. If not specified, traps with any community string are accepted. This provides basic authentication for trap sources. This parameter is required when using SNMP v1 or v2c.
It is specified as a string and is optional when using v3.
nodes:
  - name: <node name>
    type: snmp_trap_input
    community: "public"
user
The user parameter specifies the SNMP v3 username. This parameter is required when using SNMP version 3. It is specified as a string.
nodes:
  - name: <node name>
    type: snmp_trap_input
    version: v3
    user: snmp_user
security_level
The security_level parameter specifies the security level for SNMP v3. Options include:
no_auth_no_priv: No authentication or encryption (default)auth_no_priv: Authentication onlyauth_priv: Authentication and encryption
It is specified as a string and is optional (v3 only).
nodes:
  - name: <node name>
    type: snmp_trap_input
    version: v3
    user: snmp_user
    security_level: auth_priv
auth_type
The auth_type parameter specifies the authentication protocol for SNMP v3. Options include:
md5: MD5 authentication (default)sha: SHA-1 authenticationsha224: SHA-224 authenticationsha256: SHA-256 authenticationsha384: SHA-384 authenticationsha512: SHA-512 authentication
It is specified as a string and is optional (v3 only).
nodes:
  - name: <node name>
    type: snmp_trap_input
    version: v3
    user: snmp_user
    security_level: auth_priv
    auth_type: sha256
auth_password
The auth_password parameter specifies the authentication password for SNMP v3. This parameter is required when security_level includes authentication (auth_no_priv or auth_priv).
It is specified as a string and is optional (v3 only).
This field supports secret references for secure credential management. Instead of hardcoding sensitive values, you can reference a secret configured in your pipeline.
To use a secret in the GUI:
- Create a secret in your pipeline’s Settings > Secrets section (see Secrets)
- In this field, select the secret name from the dropdown list that appears
To use a secret in YAML:
Reference it using the syntax: '{{ SECRET secret-name }}'
Example:
field_name: '{{ SECRET my-credential }}'
Note: The secret reference must be enclosed in single quotes when using YAML. Secret values are encrypted at rest and resolved at runtime, ensuring no plaintext credentials appear in logs or API responses.
nodes:
  - name: <node name>
    type: snmp_trap_input
    version: v3
    user: snmp_user
    security_level: auth_priv
    auth_type: sha256
    auth_password: my_auth_password
privacy_type
The privacy_type parameter specifies the encryption protocol for SNMP v3. Options include:
des: DES encryption (default)aes: AES-128 encryptionaes192: AES-192 encryptionaes256: AES-256 encryptionaes192c: AES-192 with CFB modeaes256c: AES-256 with CFB mode
It is specified as a string and is optional (v3 only).
nodes:
  - name: <node name>
    type: snmp_trap_input
    version: v3
    user: snmp_user
    security_level: auth_priv
    privacy_type: aes256
privacy_password
The privacy_password parameter specifies the encryption password for SNMP v3. This parameter is required when security_level is auth_priv.
It is specified as a string and is optional (v3 only).
This field supports secret references for secure credential management. Instead of hardcoding sensitive values, you can reference a secret configured in your pipeline.
To use a secret in the GUI:
- Create a secret in your pipeline’s Settings > Secrets section (see Secrets)
- In this field, select the secret name from the dropdown list that appears
To use a secret in YAML:
Reference it using the syntax: '{{ SECRET secret-name }}'
Example:
field_name: '{{ SECRET my-credential }}'
Note: The secret reference must be enclosed in single quotes when using YAML. Secret values are encrypted at rest and resolved at runtime, ensuring no plaintext credentials appear in logs or API responses.
nodes:
  - name: <node name>
    type: snmp_trap_input
    version: v3
    user: snmp_user
    security_level: auth_priv
    privacy_type: aes256
    privacy_password: my_priv_password
engine_id
The engine_id parameter specifies the server’s authoritative engine ID for SNMP v3 trap reception. The engine ID is a unique identifier that establishes the authority for the SNMP agent receiving traps. If not specified, an engine ID will be auto-generated based on the server’s configuration.
The engine ID should be provided as a hexadecimal string. It is specified as a string and is optional (v3 only).
nodes:
  - name: <node name>
    type: snmp_trap_input
    version: v3
    user: snmp_user
    security_level: auth_priv
    auth_type: sha256
    auth_password: my_auth_password
    privacy_type: aes256
    privacy_password: my_priv_password
    engine_id: "80001f8880c6127623566ce6a064"
rate_limit
The rate_limit parameter enables you to control data ingestion based on system resource usage. This advanced setting helps prevent source nodes from overwhelming the agent by automatically throttling or stopping data collection when CPU or memory thresholds are exceeded.
Use rate limiting to prevent runaway log collection from overwhelming the agent in high-volume sources, protect agent stability in resource-constrained environments with limited CPU/memory, automatically throttle during bursty traffic patterns, and ensure fair resource allocation across source nodes in multi-tenant deployments.
When rate limiting triggers, pull-based sources (File, S3, HTTP Pull) stop fetching new data, push-based sources (HTTP, TCP, UDP, OTLP) reject incoming data, and stream-based sources (Kafka, Pub/Sub) pause consumption. Rate limiting operates at the source node level, where each source with rate limiting enabled independently monitors and enforces its own thresholds.
Rate limiting vs backpressure: Rate limiting and backpressure are different mechanisms. Rate limiting controls data ingestion at the source based on CPU or memory thresholds. Backpressure controls data output at the destination when in-memory queues fill up. Backpressure logs such as
backpressure: dataCh at 92% capacitydo not appear when rate limiting triggers, and rate limiting logs do not appear during backpressure events.
Observability: When rate limiting is active in enforce mode, the agent does not produce INFO, WARN, or ERROR level logs. To confirm that rate limiting is triggering, check the source node’s Bytes I/O metrics in the Edge Delta app for gaps or drops that coincide with expected throttling periods.
Configuration Steps:
- Click Add New in the Rate Limit section
- Click Add New for Evaluation Policy
- Select Policy Type:
- CPU Usage: Monitors CPU consumption and rate limits when usage exceeds defined thresholds. Use for CPU-intensive sources like file parsing or complex transformations.
- Memory Usage: Monitors memory consumption and rate limits when usage exceeds defined thresholds. Use for memory-intensive sources like large message buffers or caching.
- AND (composite): Combines multiple sub-policies with AND logic. All sub-policies must be true simultaneously to trigger rate limiting. Use when you want conservative rate limiting (both CPU and memory must be high).
- OR (composite): Combines multiple sub-policies with OR logic. Any sub-policy can trigger rate limiting. Use when you want aggressive rate limiting (either CPU or memory being high triggers).
- Select Evaluation Mode. Choose how the policy behaves when thresholds are exceeded:
- Enforce (default): Actively applies rate limiting when thresholds are met. Pull-based sources (File, S3, HTTP Pull) stop fetching new data, push-based sources (HTTP, TCP, UDP, OTLP) reject incoming data, and stream-based sources (Kafka, Pub/Sub) pause consumption. Use in production to protect agent resources.
- Monitor: Logs when rate limiting would occur without actually limiting data flow. Use for testing thresholds before enforcing them in production.
- Passthrough: Disables rate limiting entirely while keeping the configuration in place. Use to temporarily disable rate limiting without removing configuration.
- Set Absolute Limits and Relative Limits (for CPU Usage and Memory Usage policies)
Note: If you specify both absolute and relative limits, the system evaluates both conditions and rate limiting triggers when either condition is met (OR logic). For example, if you set absolute limit to
1.0CPU cores and relative limit to50%, rate limiting triggers when the source uses either 1 full core OR 50% of available CPU, whichever happens first.
For CPU Absolute Limits: Enter value in full core units:
0.1= one-tenth of a CPU core0.5= half a CPU core1.0= one full CPU core2.0= two full CPU cores
For CPU Relative Limits: Enter percentage of total available CPU (0-100):
50= 50% of available CPU75= 75% of available CPU85= 85% of available CPU
For Memory Absolute Limits: Enter value in bytes
104857600= 100Mi (100 × 1024 × 1024)536870912= 512Mi (512 × 1024 × 1024)1073741824= 1Gi (1 × 1024 × 1024 × 1024)
For Memory Relative Limits: Enter percentage of total available memory (0-100)
60= 60% of available memory75= 75% of available memory80= 80% of available memory
- Set Refresh Interval (for CPU Usage and Memory Usage policies). Specify how frequently the system checks resource usage:
- Recommended Values:
10sto30sfor most use cases5sto10sfor high-volume sources requiring quick response1mor higher for stable, low-volume sources
The system fetches current CPU/memory usage at the specified refresh interval and uses that value for evaluation until the next refresh. Shorter intervals provide more responsive rate limiting but incur slightly higher overhead, while longer intervals are more efficient but slower to react to sudden resource spikes.
The GUI generates YAML as follows:
# Simple CPU-based rate limiting
nodes:
  - name: <node name>
    type: <node type>
    rate_limit:
      evaluation_policy:
        policy_type: cpu_usage
        evaluation_mode: enforce
        absolute_limit: 0.5  # Limit to half a CPU core
        refresh_interval: 10s
# Simple memory-based rate limiting
nodes:
  - name: <node name>
    type: <node type>
    rate_limit:
      evaluation_policy:
        policy_type: memory_usage
        evaluation_mode: enforce
        absolute_limit: 536870912  # 512Mi in bytes
        refresh_interval: 30s
Composite Policies (AND / OR)
When using AND or OR policy types, you define sub-policies instead of limits. Sub-policies must be siblings (at the same level)—do not nest sub-policies within other sub-policies. Each sub-policy is independently evaluated, and the parent policy’s evaluation mode applies to the composite result.
- AND Logic: All sub-policies must evaluate to true at the same time to trigger rate limiting. Use when you want conservative rate limiting (limit only when CPU AND memory are both high).
- OR Logic: Any sub-policy evaluating to true triggers rate limiting. Use when you want aggressive protection (limit when either CPU OR memory is high).
Configuration Steps:
- Select AND (composite) or OR (composite) as the Policy Type
- Choose the Evaluation Mode (typically Enforce)
- Click Add New under Sub-Policies to add the first condition
- Configure the first sub-policy by selecting policy type (CPU Usage or Memory Usage), selecting evaluation mode, setting absolute and/or relative limits, and setting refresh interval
- In the parent policy (not within the child), click Add New again to add a sibling sub-policy
- Configure additional sub-policies following the same pattern
The GUI generates YAML as follows:
# AND composite policy - both CPU AND memory must exceed limits
nodes:
  - name: <node name>
    type: <node type>
    rate_limit:
      evaluation_policy:
        policy_type: and
        evaluation_mode: enforce
        sub_policies:
          # First sub-policy (sibling)
          - policy_type: cpu_usage
            evaluation_mode: enforce
            absolute_limit: 0.75  # Limit to 75% of one core
            refresh_interval: 15s
          # Second sub-policy (sibling)
          - policy_type: memory_usage
            evaluation_mode: enforce
            absolute_limit: 1073741824  # 1Gi in bytes
            refresh_interval: 15s
# OR composite policy - either CPU OR memory can trigger
nodes:
  - name: <node name>
    type: <node type>
    rate_limit:
      evaluation_policy:
        policy_type: or
        evaluation_mode: enforce
        sub_policies:
          - policy_type: cpu_usage
            evaluation_mode: enforce
            relative_limit: 85  # 85% of available CPU
            refresh_interval: 20s
          - policy_type: memory_usage
            evaluation_mode: enforce
            relative_limit: 80  # 80% of available memory
            refresh_interval: 20s
# Monitor mode for testing thresholds
nodes:
  - name: <node name>
    type: <node type>
    rate_limit:
      evaluation_policy:
        policy_type: memory_usage
        evaluation_mode: monitor  # Only logs, doesn't limit
        relative_limit: 70  # Test at 70% before enforcing
        refresh_interval: 30s
source_metadata
This option is used to define which detected resources and attributes to add to each data item as it is ingested by Edge Delta. You can select:
- Required Only: This option includes the minimum required resources and attributes for Edge Delta to operate.
- Default: This option includes the required resources and attributes plus those selected by Edge Delta
- High: This option includes the required resources and attributes along with a larger selection of common optional fields.
- Custom: With this option selected, you can choose which attributes and resources to include. The required fields are selected by default and can’t be unchecked.
Based on your selection in the GUI, the source_metadata YAML is populated as two dictionaries (resource_attributes and attributes) with Boolean values.
See Choose Data Item Metadata for more information on selecting metadata.
Advanced Configuration
SNMP v3 Configuration
SNMP v3 provides enhanced security for trap reception with user-based authentication and optional encryption. The following example demonstrates a complete v3 configuration:
nodes:
- name: snmp_trap_v3
  type: snmp_trap_input
  port: 162
  listen: "0.0.0.0"
  transport: udp
  version: v3
  user: trap_admin
  security_level: auth_priv
  auth_type: sha256
  auth_password: secure_auth_pass_123
  privacy_type: aes256
  privacy_password: secure_priv_pass_456
  engine_id: "80001f8880c6127623566ce6a064"
SNMP v3 Security Parameters
user
The SNMP v3 username (required for v3).
security_level
The security level for SNMP v3. Options include:
no_auth_no_priv: No authentication or encryption (default)auth_no_priv: Authentication onlyauth_priv: Authentication and encryption (recommended)
auth_type
Authentication protocol. Options include:
md5: MD5 authentication (default)sha: SHA-1 authenticationsha224: SHA-224 authenticationsha256: SHA-256 authentication (recommended)sha384: SHA-384 authenticationsha512: SHA-512 authentication
auth_password
Authentication password (required when security_level includes auth).
This field supports secret references for secure credential management. Instead of hardcoding sensitive values, you can reference a secret configured in your pipeline.
To use a secret in the GUI:
- Create a secret in your pipeline’s Settings > Secrets section (see Secrets)
- In this field, select the secret name from the dropdown list that appears
To use a secret in YAML:
Reference it using the syntax: '{{ SECRET secret-name }}'
Example:
field_name: '{{ SECRET my-credential }}'
Note: The secret reference must be enclosed in single quotes when using YAML. Secret values are encrypted at rest and resolved at runtime, ensuring no plaintext credentials appear in logs or API responses.
privacy_type
Encryption protocol. Options include:
des: DES encryption (default)aes: AES-128 encryptionaes192: AES-192 encryptionaes256: AES-256 encryption (recommended)aes192c: AES-192 with CFB modeaes256c: AES-256 with CFB mode
privacy_password
Encryption password (required when security_level is auth_priv).
This field supports secret references for secure credential management. Instead of hardcoding sensitive values, you can reference a secret configured in your pipeline.
To use a secret in the GUI:
- Create a secret in your pipeline’s Settings > Secrets section (see Secrets)
- In this field, select the secret name from the dropdown list that appears
To use a secret in YAML:
Reference it using the syntax: '{{ SECRET secret-name }}'
Example:
field_name: '{{ SECRET my-credential }}'
Note: The secret reference must be enclosed in single quotes when using YAML. Secret values are encrypted at rest and resolved at runtime, ensuring no plaintext credentials appear in logs or API responses.
engine_id
The authoritative engine ID for SNMP v3. This is a unique hexadecimal identifier that establishes the authority for the SNMP agent receiving traps. If not specified, an engine ID will be auto-generated. For devices sending traps, you may need to configure this engine ID on the trap source to match the receiving agent.
Configuring SNMP Trap Sources
Cisco IOS/IOS-XE Configuration
Configure Cisco devices to send SNMP traps to Edge Delta. The snmp-server host command specifies the trap destination, while snmp-server enable traps controls which trap types are sent.
snmp-server host <edge-delta-host> version 2c public udp-port 1162
snmp-server enable traps snmp authentication linkdown linkup coldstart warmstart
snmp-server enable traps envmon fan shutdown supply temperature status
snmp-server enable traps cpu threshold
snmp-server enable traps memory bufferpeak
snmp-server enable traps config
This configuration sends authentication, environmental, CPU, memory, and configuration change traps to Edge Delta. The traps use SNMPv2c format with the “public” community string.
Juniper Junos Configuration
Configure Juniper devices to forward SNMP traps for system events and chassis alarms. The trap-group defines the destination and trap categories, while trap-options controls which specific events generate traps.
set snmp trap-group edge-delta version v2
set snmp trap-group edge-delta targets <edge-delta-host> port 1162
set snmp trap-group edge-delta categories authentication
set snmp trap-group edge-delta categories chassis
set snmp trap-group edge-delta categories link
set snmp trap-group edge-delta categories remote-operations
set snmp trap-options source-address lo0
Linux Net-SNMP Configuration
Configure Linux systems to send traps using snmpd and snmptrapd. The configuration enables standard system traps and custom application traps.
# /etc/snmp/snmpd.conf
trap2sink <edge-delta-host>:1162 public
authtrapenable 1
linkUpDownNotifications yes
defaultMonitors yes
After configuration, restart snmpd:
sudo systemctl restart snmpd
To send custom traps from applications or scripts:
# Send a custom application trap
snmptrap -v 2c -c public <edge-delta-host>:1162 '' \
  1.3.6.1.4.1.YOUR_ENTERPRISE_OID.1.1 \
  1.3.6.1.4.1.YOUR_ENTERPRISE_OID.1.1.1 s "Application error occurred" \
  1.3.6.1.4.1.YOUR_ENTERPRISE_OID.1.1.2 i 500
VMware ESXi Configuration
Configure ESXi hosts to send SNMP traps for hardware and virtual machine events:
# Enable SNMP
esxcli system snmp set --enable true

# Configure trap destination
esxcli system snmp set --targets <edge-delta-host>@1162/public

# Set community string
esxcli system snmp set --communities public

# Enable specific trap types
esxcli system snmp set --hwsrc sensors
esxcli system snmp set --loglevel info
Windows SNMP Service
Configure Windows Server to send SNMP traps:
- Install SNMP Service via Server Manager or PowerShell:
Install-WindowsFeature SNMP-Service -IncludeManagementTools
- Configure trap destination via Registry or PowerShell:
# Add trap destination
New-ItemProperty -Path "HKLM:\SYSTEM\CurrentControlSet\Services\SNMP\Parameters\TrapConfiguration\public" `
  -Name "1" -Value "<edge-delta-host>:1162" -PropertyType String

# Restart service
Restart-Service SNMP
Application Integration
Python with pysnmp
Send custom traps from Python applications:
from pysnmp.hlapi import *
from pysnmp.proto import rfc1902

def send_trap(message, severity):
    error_indication, error_status, error_index, var_binds = next(
        sendNotification(
            SnmpEngine(),
            CommunityData('public'),
            UdpTransportTarget(('<edge-delta-host>', 1162)),
            ContextData(),
            'trap',
            NotificationType(
                ObjectIdentity('1.3.6.1.4.1.YOUR_OID.1.1')
            ).addVarBinds(
                ('1.3.6.1.4.1.YOUR_OID.1.1.1', OctetString(message)),
                ('1.3.6.1.4.1.YOUR_OID.1.1.2', Integer32(severity))
            )
        )
    )

    if error_indication:
        print(f'Trap failed: {error_indication}')

# Usage
send_trap("Database connection pool exhausted", 3)
send_trap("Backup completed successfully", 6)
Java with SNMP4J
Send traps from Java applications:
import org.snmp4j.*;
import org.snmp4j.mp.*;
import org.snmp4j.smi.*;
import org.snmp4j.transport.*;

public class TrapSender {
    public static void sendTrap(String message) throws IOException {
        TransportMapping transport = new DefaultUdpTransportMapping();
        Snmp snmp = new Snmp(transport);
        transport.listen();

        CommunityTarget target = new CommunityTarget();
        target.setCommunity(new OctetString("public"));
        target.setAddress(new UdpAddress("<edge-delta-host>/1162"));
        target.setVersion(SnmpConstants.version2c);

        PDU pdu = new PDU();
        pdu.setType(PDU.TRAP);
        pdu.add(new VariableBinding(SnmpConstants.sysUpTime,
            new TimeTicks(System.currentTimeMillis() / 10)));
        pdu.add(new VariableBinding(SnmpConstants.snmpTrapOID,
            new OID("1.3.6.1.4.1.YOUR_OID.1.1")));
        pdu.add(new VariableBinding(new OID("1.3.6.1.4.1.YOUR_OID.1.1.1"),
            new OctetString(message)));

        snmp.send(pdu, target);
        snmp.close();
    }
}
Testing SNMP Trap Configuration
After configuring your devices, test trap delivery using these methods:
Using snmptrap Command
# Test SNMPv2c trap
snmptrap -v 2c -c public <edge-delta-host>:1162 '' \
  1.3.6.1.6.3.1.1.5.3 \
  1.3.6.1.6.3.1.1.5.3 s "Test trap from $(hostname)"

# Test SNMPv1 trap
snmptrap -v 1 -c public <edge-delta-host>:1162 \
  1.3.6.1.4.1.9 $(hostname -I | awk '{print $1}') 6 1 '' \
  1.3.6.1.2.1.1.5.0 s $(hostname)
Verify Receipt
Check Edge Delta Live Capture to confirm traps are being received and parsed correctly. Look for:
- Correct source IP in
network.peer.ip - Proper trap type identification
- Complete varbind extraction
- Accurate timestamp processing
Best Practices
Port Selection
When configuring the SNMP Trap source node, consider port accessibility and security requirements. The standard SNMP trap port 162 requires root or administrative privileges, which may not be available in containerized deployments or restricted environments. Using port 1162 or another port above 1024 allows the Edge Delta agent to run without elevated privileges while maintaining compatibility with most SNMP trap senders that support custom port configuration.
Security Considerations
SNMP traps are transmitted in clear text without encryption, making them vulnerable to interception and spoofing. While community strings provide basic authentication, they are also sent unencrypted and should not be considered secure. Implement network segmentation to isolate SNMP traffic from untrusted networks, and use firewall rules to restrict which devices can send traps to your Edge Delta agents. For sensitive environments, consider using dedicated VLANs or VPNs for SNMP traffic. Monitor for unusual trap patterns that might indicate spoofing attempts or compromised devices.
Trap Filtering and Processing
Not all SNMP traps require the same level of attention or retention. Configure your source devices to send only relevant traps to reduce noise and processing overhead. Use Edge Delta processors to filter, enrich, or route traps based on their type, severity, or source. For example, you might route critical hardware failure traps to immediate alerting while aggregating informational traps for trend analysis. Consider implementing rate limiting for high-volume trap sources to prevent overwhelming your pipeline during network events or misconfigurations.
Performance Optimization
SNMP traps use UDP for transport, which provides low overhead but no delivery guarantee. During high-volume events like network outages, trap storms can occur where devices send thousands of traps simultaneously. Configure appropriate buffer sizes in your Edge Delta agent to handle burst traffic without drops. Monitor the snmp.variables.count attribute to identify complex traps that might impact processing performance. For environments with numerous trap sources, consider deploying multiple Edge Delta agents and using anycast or load balancing to distribute the trap processing load.
Varbind Processing
SNMP traps contain variable bindings (varbinds) that carry the actual event data. These are stored in the snmp.varbinds attribute as OID-value pairs. The OIDs are typically long numeric strings that require MIB files for human-readable translation. Consider using OTTL functions or processors to map common OIDs to meaningful field names in your pipeline. For time-based values like uptime, Edge Delta automatically provides multiple formats (centiseconds, duration string, seconds) for flexibility in downstream processing.
Troubleshooting
Traps Not Received
If traps are not appearing in Live Capture, verify network connectivity between trap sources and the Edge Delta agent using ping or traceroute. Check firewall rules on both the source device and the Edge Delta host to ensure UDP traffic is allowed on the configured port. Confirm the Edge Delta agent has successfully started the SNMP trap listener by checking agent logs. Test with a simple snmptrap command from the same network segment to isolate network versus configuration issues.
Authentication Failures
When using community string validation, ensure the community string in your trap source configuration exactly matches the one configured in the Edge Delta node. Community strings are case-sensitive. Check device logs for authentication failure messages. If traps from some devices work but others don’t, verify all devices are configured with the correct community string.
Incomplete Varbind Data
If varbind data appears truncated or missing, check whether the trap source is sending complete information. Some devices may require additional configuration to include all relevant OIDs in their traps. Use packet capture tools like tcpdump or Wireshark to examine the raw trap packets and verify their content. Large traps with many varbinds may be fragmented at the network layer - ensure your network MTU settings accommodate the trap sizes.
Port Binding Issues
If the agent cannot bind to the specified port, verify no other process is using that port with netstat -uln | grep <port>. For ports below 1024, ensure the Edge Delta agent has appropriate privileges or switch to a higher port number. In Kubernetes environments, confirm the pod security context allows the specified port. Container runtime security policies may also restrict certain port ranges.
Configuration Wizard
Use this interactive wizard to generate a starter configuration:
Which SNMP version will devices send traps in?
Choose the protocol version based on your device capabilities.