Provide AWS Authentication for Edge Delta
7 minute read
Overview
This page provides a detailed walkthrough on how to configure AWS authentication for Edge Delta using three different methods: providing AWS access keys and secrets in the UI, setting environment variables, and leveraging IAM roles with Kubernetes service accounts. The Configure AWS Assumed Roles page, on the other hand focuses on configuring AWS authentication for specific scenarios, such as accessing AWS resources through Cloud pipelines and rehydration components, which require assumed roles.
Maintaining security is crucial when handling AWS credentials. Core principles include:
- Use Temporary Credentials: Use IAM roles and temporary credentials whenever possible to minimize the risk of credential exposure.
- Environment Variable Security: Ensure that environment variables containing credentials are managed securely and not hard-coded.
- Rotate Credentials Regularly: Regularly rotate IAM roles and access keys to enhance security and minimize the impact if credentials are compromised.
- Monitor and Audit Activities: Track and audit actions performed with your AWS credentials, ensuring ongoing oversight and compliance.
Authorizing Edge Delta
There are three methods to provide AWS authentication for Edge Delta. Leveraging IAM roles with Kubernetes service accounts (Option 3) is the best practice. It enhances the security of your AWS authentication processes within Edge Delta while simplifying credential management and reducing potential risks.
Option 1. Providing AWS Access Keys and Secrets in the UI
This involves entering your AWS access key and secret key directly in the node output form on Edge Delta.
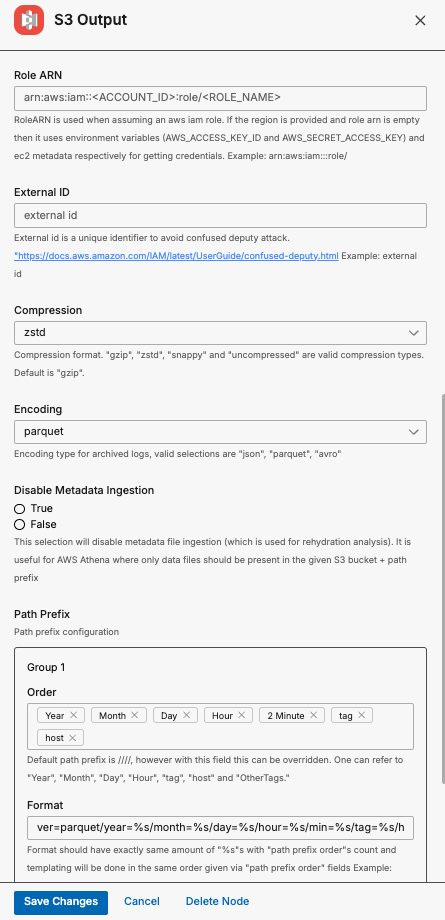
Create an AWS destination node such as an S3 destination:
- Click Pipelines.
- Select a pipeline that you want to add an AWS destination to.
- Click View/Edit Pipeline.
- Click Edit Mode.
- Click Add Node.
- Select S3 Destination.
- Configure the output by filling in the form, including the AWS Key and AWS Secret Key.
The Edge Delta platform will securely store and use these credentials for authenticating with AWS services.
Option 2. Setting Environment Variables
This method requires setting the AWS access key and secret key as environment variables within your Kubernetes configuration for Edge Delta.
Kubectl Example:
- Create a local copy of the manifest using Helm
Note: The kubectl installation method is no longer supported. Please use Helm. If you require a manifest please generate one using Helm.
- Open the manifest file and edit the DaemonSet to add environment variables:
apiVersion: apps/v1
kind: DaemonSet
metadata:
  name: edgedelta
  namespace: edgedelta
spec:
  containers:
    - name: edgedelta-agent
      image: gcr.io/edgedelta/agent:v0.1.105
      env:
        - name: AWS_ACCESS_KEY_ID
          value: "<YOUR_ACCESS_KEY>"
        - name: AWS_SECRET_ACCESS_KEY
          value: "<YOUR_SECRET_KEY>"
...
Replace <YOUR_ACCESS_KEY> and <YOUR_SECRET_KEY> with your AWS credentials.
- Use kubectl to apply the updated manifest:
kubectl apply -f updated-manifest.yaml
- Reference each secret as follows in the Edge Delta UI or YAML when configuring a Pipeline:
{{ Env "AWS_ACCESS_KEY_ID" }}
{{ Env "AWS_SECRET_ACCESS_KEY" }}
For example:
- name: s3_output
  type: s3_output
  region: us-west-2
  aws_key_id: `{{ Env "AWS_ACCESS_KEY_ID" }}`
  aws_sec_key: `{{ Env "AWS_SECRET_ACCESS_KEY" }}`
  bucket: test
  use_native_compression: false
  disable_metadata_ingestion: false
Helm Example:
- Pass the environment variables in when installing with helm:
helm upgrade edgedelta edgedelta/edgedelta -i --version v0.1.105 --set secretApiKey.value=12345678998765431 -n edgedelta --create-namespace \
  --set agent.env[0].name=AWS_ACCESS_KEY_ID \
  --set agent.env[0].value=<YOUR_ACCESS_KEY> \
  --set agent.env[1].name=AWS_SECRET_ACCESS_KEY \
  --set agent.env[1].value=<YOUR_SECRET_KEY>
Replace <YOUR_ACCESS_KEY> and <YOUR_SECRET_KEY> with your AWS credentials.
Alternatively, create Kubernetes secrets with a secrets manager such as bitnami kubeseal. See GitOps Principles Deployment of Edge Delta
- Reference each secret as follows in the Edge Delta UI or YAML when configuring a Pipeline:
{{ Env "AWS_ACCESS_KEY_ID" }}
{{ Env "AWS_SECRET_ACCESS_KEY" }}
For example:
- name: s3_output
  type: s3_output
  region: us-west-2
  aws_key_id: `{{ Env "AWS_ACCESS_KEY_ID" }}`
  aws_sec_key: `{{ Env "AWS_SECRET_ACCESS_KEY" }}`
  bucket: test
  use_native_compression: false
  disable_metadata_ingestion: false
Linux Systemd-Compatible Method (Recommended for Long-Running Services)
For Linux-based Edge Delta agents running as systemd services (where the default Linux install path is /opt/edgedelta/agent/), environment variables must be set in a system-level context (i.e. use /etc/sysconfig/edgedelta). Using export in a shell session will not propagate these variables to the agent if it’s managed by systemd.
For example, if your YAML config uses:
aws_key_id: '{{ Env "ENV_AWS_ACCESS_KEY" }}'
aws_sec_key: '{{ Env "ENV_AWS_SECRET" }}'
and credentials are not being picked up, do the following:
- Create the Sysconfig File
sudo mkdir -p /etc/sysconfig/
sudo touch /etc/sysconfig/edgedelta
- Add Environment Variables Edit the file:
sudo vi /etc/sysconfig/edgedelta
Press i and add:
ENV_AWS_ACCESS_KEY=AKIAIOSFODNN7EXAMPLE
ENV_AWS_SECRET=wJalrXUtnFEMI/K7MDENG/bPxRfiCYEXAMPLEKEY
Save and exit:
- Press Esc
- Type
:wqand hit Enter
- Restart the Agent
sudo systemctl daemon-reexec
sudo systemctl daemon-reload
sudo systemctl restart edgedelta
- Validate the Environment Confirm variables are set:
sudo cat /proc/$(pidof edgedelta)/environ | tr '\0' '\n' | grep ENV
Expected output:
ENV_AWS_ACCESS_KEY=AKIAIOSFODNN7EXAMPLE
ENV_AWS_SECRET=wJalrXUtnFEMI/K7MDENG/bPxRfiCYEXAMPLEKEY
Edge Delta’s Linux agent is managed by systemd, and its service unit explicitly supports loading environment variables from /etc/sysconfig/edgedelta. This method is preferred over alternatives like export commands or systemctl edit overrides because it integrates directly with the service’s existing configuration, requires no changes to unit files, and ensures variables are securely and persistently loaded at startup. It also aligns with standard Linux practices for service-level environment management, making it easier to automate, audit, and maintain.
See Edge Delta Environment Variables.
Security Best Practices
Restrict file access:
sudo chmod 600 /etc/sysconfig/edgedelta
sudo chown root:root /etc/sysconfig/edgedelta
Use IAM roles when possible: If your agents run on EC2 or EKS, prefer IAM roles over static credentials to reduce risk.
Option 3. Leveraging IAM Roles with Kubernetes Service Accounts (Best Practice)
This method is considered the best practice for providing AWS credentials to applications running in Kubernetes, especially on Amazon EKS. It leverages IAM roles to grant Kubernetes pods the necessary AWS permissions without embedding long-lived credentials in the application.
Kubectl Example:
- Create a local copy of the manifest using Helm
Note: The kubectl installation method is no longer supported. Please use Helm. If you require a manifest please generate one using Helm.
- Update the Edge Delta manifest’s service account and annotate it with the IAM role ARN. This ties the Kubernetes service account to an IAM role that has the necessary permissions.
apiVersion: v1
kind: ServiceAccount
metadata:
  name: edgedelta
  namespace: edgedelta
  annotations:
    eks.amazonaws.com/role-arn: arn:aws:iam::<ACCOUNT_ID>:role/<ROLE_NAME>
Replace arn:aws:iam::<ACCOUNT_ID>:role/<ROLE_NAME> with the ARN of the IAM role you want the service account to assume.
- Ensure the Edge Delta DaemonSet and Deployments use this Service Account:
The Edge Delta DaemonSet, along with the Compactor Agent Deployments and rollup Agent Deployment, should refer to this service account in their specifications.
For example, the DaemonSet in the manifest should look like this:
apiVersion: apps/v1
kind: DaemonSet
metadata:
  name: edgedelta
  namespace: edgedelta
spec:
  serviceAccountName: edgedelta  # Use the service account specified above
  containers:
    - name: edgedelta-agent
      image: gcr.io/edgedelta/agent:v0.1.105
      # Other container specs...
- When configuring an AWS output or destination such as an S3 destination, leave the
aws_key_idandaws_sec_keyfields blank.
Helm Example 1:
- Create a Helm override file (for example
values.yaml) to update the Edge Delta service account and annotate it with the IAM role ARN. This ties the Kubernetes service account to an IAM role that has the necessary permissions.
serviceAccount:
  create: true
  name: edgedelta
  annotations:
    eks.amazonaws.com/role-arn: arn:aws:iam::<ACCOUNT_ID>:role/<ROLE_NAME>  # Replace with your actual IAM Role ARN
Replace arn:aws:iam::<ACCOUNT_ID>:role/<ROLE_NAME> with the ARN of the IAM role you want the service account to assume.
- Pass in values override by adding
-f values.yamlto the helm upgrade command:
helm upgrade edgedelta edgedelta/edgedelta -i --version v0.1.105 --set secretApiKey.value=1234567899876543621 -n edgedelta --create-namespace -f values.yaml
- When configuring an AWS output or destination such as an S3 destination, leave the
aws_key_idandaws_sec_keyfields blank.
Helm Example 2: Alternatively, instead of creating an override file, you can achieve the same configuration by passing in parameters directly via the Helm command line.
- Pass in role annotation
helm upgrade edgedelta edgedelta/edgedelta -i --version v0.1.105 --set secretApiKey.value=1234567899876543621 -n edgedelta --create-namespace \
  --set serviceAccount.create=true \
  --set serviceAccount.name=edgedelta \
  --set serviceAccount.annotations.eks\.amazonaws\.com/role-arn=arn:aws:iam::<ACCOUNT_ID>:role/<ROLE_NAME>
Replace arn:aws:iam::<ACCOUNT_ID>:role/<ROLE_NAME> with the ARN of the IAM role you want the service account to assume.
- When configuring an AWS output or destination such as an S3 destination, leave the
aws_key_idandaws_sec_keyfields blank.
Summary
When leveraging IAM Roles with Kubernetes Service Accounts, kubernetes injects a token into the pod, which the AWS SDK uses to obtain temporary credentials for accessing AWS services. This token is used by the AWS SDK to dynamically obtain temporary credentials that IAM roles provide.
Benefits of Using IAM Roles with Kubernetes Service Accounts
- Security: Least Privilege: Easily enforce the principle of least privilege by assigning only the necessary permissions to the IAM role.
- Credential Management: Reduces the operational overhead of managing and rotating long-lived credentials.
- Simplicity and Automation: Automatic Token Rotation: AWS handles the automatic rotation and expiration of the temporary credentials.
- Seamless Integration: AWS SDKs are built to work seamlessly with IAM roles, making the integration straightforward.
- Scalability: Centralized Management: Centralize permissions management through IAM roles, making it easier to audit and update permissions. Replicability: Easily replicate configurations across different environments by reusing IAM roles.