Troubleshooting Uneven Deployments
5 minute read
Overview
There are many reasons why you might have a Kubernetes cluster with an uneven distribution of pods to nodes. It can be intentional for performance, cost, or availability reasons, or it can be a symptom of misconfigured scheduling policies.
If autoscaling policies are not perfectly balanced, some nodes may become crowded while others remain sparsely populated. Similarly, if certain nodes fail to drain properly or have restrictive scheduling policies, Kubernetes might place fewer pods on them.
However, some nodes may be optimized for specific types of workloads, while other nodes handle general-purpose workloads. Kubernetes allows pods to be scheduled on specific nodes using node affinity or to avoid certain nodes using taints and tolerations. For example, A cluster may have a mix of on-premise bare metal nodes (handling latency-sensitive services) and cloud-based nodes (scaling batch processing jobs). Some nodes may have fewer pods because they’re reserved for critical, low-latency applications. Or a cluster might have a set of nodes handling real-time data ingestion from IoT devices, leading to high CPU/memory usage on those nodes, while less-critical workloads sit on lightly loaded nodes.
If you use cloud spot instances you might allow Kubernetes to schedule a majority of workloads on cost-effective spot nodes while keeping a few mission-critical workloads on on-demand or reserved instances. Pods requiring local storage (e.g., databases using hostPath or local persistent volumes) may be scheduled on specific nodes, leading to an uneven distribution. Or certain nodes may be closer to external data sources, reducing latency for specific workloads.
In these instances, a standard Edge Delta deployment in the cluster may result in some Edge Delta agents experiencing high CPU and memory use due to a load imbalance, while others remain relatively idle.
Solution
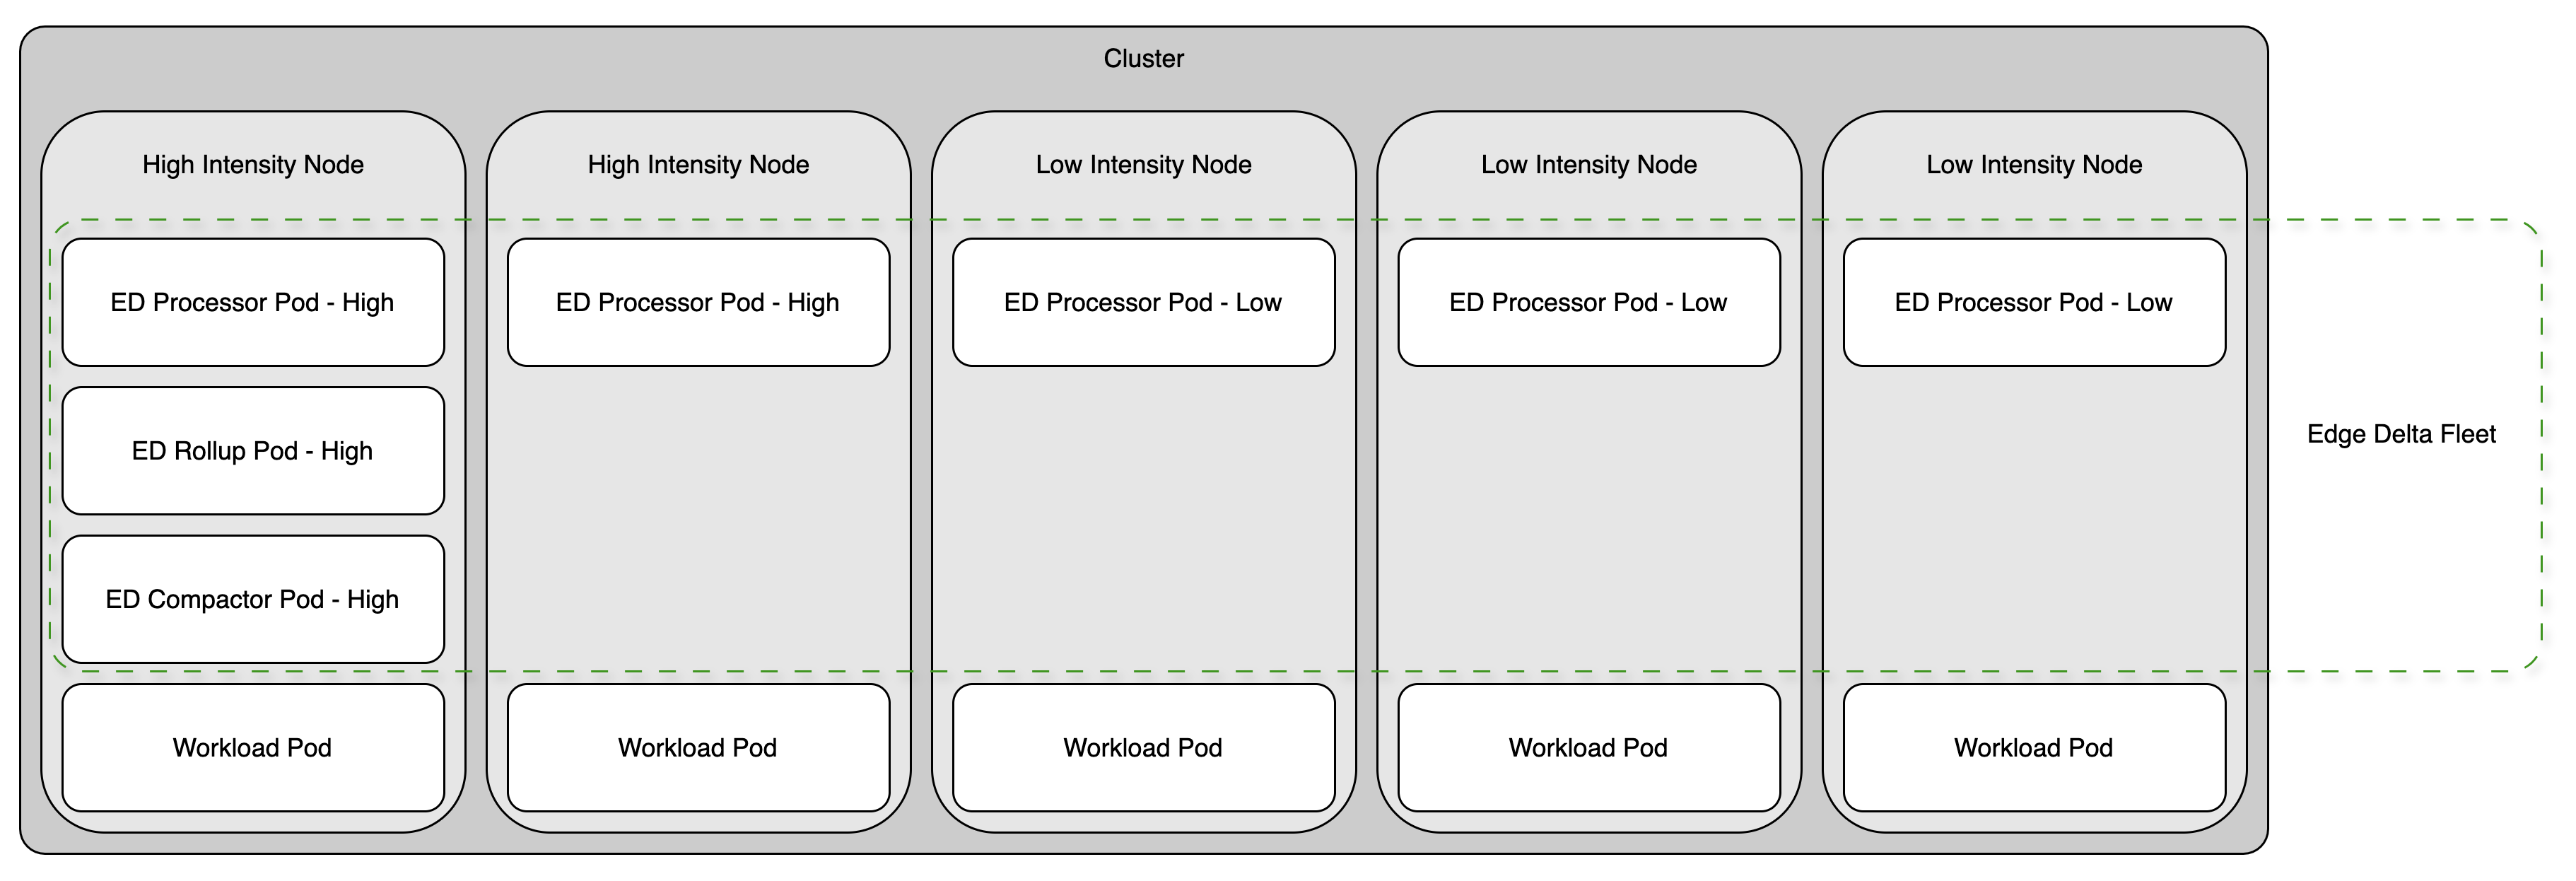
To avoid this issue, you can to specify node selectors to ensure that the Edge Delta agents with varying resource allocations are scheduled on nodes based on their data intensity. For example, you might deploy one set of agents on high intensity nodes only, and allocate those pods with high CPU and memory resources, while on low intensity nodes you deploy another set of agents with relatively lower CPU and memory resources.
The default pipeline architecture includes rollup agents and compactor agents in addition to processor agents. To avoid data duplication or leader election issues, you install rollup agents and compactor agents only in a single installation - usually one with higher resource allocation. Subsequent lower intensity node installations only deploy processor agents and you configure them to use the same API key as the high intensity agents. This ensures they remain part of the same Edge Delta pipeline.
Identify and Label Nodes
To start, you need to identify categorize and label nodes in the cluster. You can list existing nodes and include their CPU and Memory capacities:
kubectl get nodes -o custom-columns="NAME:.metadata.name,CPU:.status.capacity.cpu,MEMORY:.status.capacity.memory"
Next you label them. In this example, nodes will be labelled either as log_intensity=high or log_intensity=low.
kubectl label nodes <high-intensity-node-name> log_intensity=high
kubectl label nodes <low-intensity-node-name> log_intensity=low
If you have too many nodes to label one at a time, you can use a for loop based on the CPU number or any other metadata:
Suppose your nodes have either 4 or 8 CPUs depending on whether they are high or low intensity.
For high intensity nodes:
for node in $(kubectl get nodes -o json | jq -r '.items[] | select(.status.capacity.cpu|tonumber == 8) | .metadata.name'); do
   kubectl label nodes "$node" log-intensity=high --overwrite
done
For low intensity nodes:
for node in $(kubectl get nodes -o json | jq -r '.items[] | select(.status.capacity.cpu|tonumber == 4) | .metadata.name'); do
   kubectl label nodes "$node" log-intensity=low --overwrite
done
You can confirm the labels:
kubectl get nodes --show-labels
Plan Installation Resources
For each node type, plan memory and CPU allocations for the Edge Delta pods. You can use historical data to determine the requirements, for example by examining pod descriptions for CPU and Memory resource issues. You can also view the maximum memory metrics ed.agent.memory.virtual grouped by host in the Metrics Explorer.
Note: One installation in the cluster will include the rollup and compactor agents, which will add slightly to the resource requirements.
See Sizing and Capacity Estimations and Scale Deployments for a discussion about resource allocation.
Suppose in this instance you want to allocate 4000m CPU and 4Gi memory to Edge Delta pods on high intensity nodes, while Edge Delta pods on low intensity nodes get 2000m CPU and 2Gi memory limits.
Deploy High Intensity Agents
To start, clean up the Edge Delta installation if it isn’t a fresh install:
kubectl delete namespace edgedelta
Install the Edge Delta agents on the high intensity nodes:
helm install edgedelta-high edgedelta/edgedelta \
 --set secretApiKey.value=123456789 \
 --set resources.limits.cpu=4000m \
 --set resources.limits.memory=4Gi \
 --set nodeSelector.log-intensity=high \
 -n edgedelta \
 --create-namespace
Replace 123456789 with the API key for the pipeline configuration you want to use for the entire cluster. The resources.limits.cpu and resources.limits.memory helm values schedule resources, while the nodeSelector.log-intensity helm value ensures the installation is only on nodes with the key log-intensity and the value of high.
Deploy Low Intensity Agents
Next, install the low intensity agents.
helm upgrade edgedelta-low edgedelta/edgedelta \
 --set secretApiKey.enable=false \
 --set resources.limits.cpu=2000m \
 --set resources.limits.memory=2Gi \
 --set nodeSelector.log-intensity=low \
 --set rollUpProps.enabled=false \
 --set compactorProps.enabled=false \
 -n edgedelta
The secretApiKey.enable=false parameter ensures that this installation uses the same API key as the high intensity installation. This means all the agents will be configured as a single pipeline despite having different resource allocations. Again, the resources.limits.cpu and resources.limits.memory helm values schedule resources, while the nodeSelector.log-intensity helm value ensures the installation is only on nodes with the key log-intensity and a value of low.
A key set of parameters are rollUpProps.enabled=false and compactorProps.enabled=false. These ensure that compactor and rollup agents are not installed in these nodes. The rollup agents and compactor agents in the high intensity nodes will handle rollup and compaction for all agents in the cluster.
Check Resource Allocation
You can confirm your resource allocation by viewing the pods with custom columns for resources:
kubectl get pods -n edgedelta -o custom-columns="NAME:.metadata.name,CPU_REQUESTS:.spec.containers[*].resources.requests.cpu,CPU_LIMITS:.spec.containers[*].resources.limits.cpu,MEM_REQUESTS:.spec.containers[*].resources.requests.memory,MEM_LIMITS:.spec.containers[*].resources.limits.memory"